Showing posts with label budget. Show all posts

Tuesday, April 27, 2010

Our DIY Invitations

A more detailed look at our wedding invitations.

I knew that I wanted to make them right away and I was confident that I would be able to do it. The biggest problem was making sure that they didn't come across as super homemade (aka: I just printed this off of microsoft word and shoved it in an envelope). After we decided on colors, I made thirty-two a few trips to our local Hobby Lobby to look at paper options. There weren't a whole bunch of patterend papers in our colors so I decided solids were the best way to go.

Inspiration:

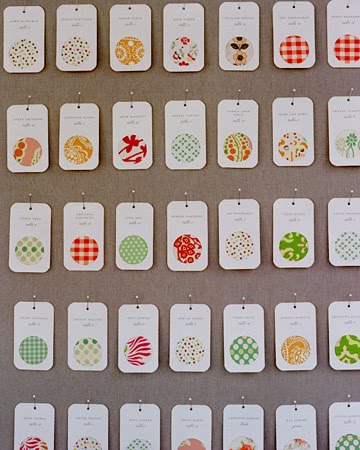
When I ran across this diy escort card display, I decided I wanted to incorporate this idea into our invitations to make them special.


Martha Stewart Weddings

I had a much easier time finding fabrics in our colors than I did with patterend paper. So I bought 1/2 yard of 3 different fabrics ($6.80) and a 1.75 inch circle whole punch ($9.99) from HL. I also purchased a corner rounder to mimi the shape of the escort cards in the photo ($6.99).

Fonts:

I looked for font solutions right away because everyone has seen the "fancy" fonts offered by Microsoft Word. No thanks. I found dafont.com and it was awesome. You can search by the type of font your looking for and they are free to download. I ended up using Jellyka, Saint-Andrew's Queen for our names and envelope labels and Hanshand for the other wording on the invitations.

Extras:

I found the love bird stamp (so cute!) at HL on sale for $2.75 and picked up the inkpad for $2.99. I knew immediately that it would be used for the outside of the envelopes. Speaking of, we picked up plain, white greeting card envelopes (50) for $4.95 at Wal-Mart.

The Finished Product:

Total Spent on Invitations:
Stamp: $2.75
Ink Pad: $2.99
Pack of White Card Stock: $4.99
Yellow Paper: $7.93
Blue Paper: $12.39
Fabric: $6.80
Evelopes: $4.95
Hole Punch: $9.99
Corner Rounder: $6.99
Total: $59.78

**Note: The whole punch and corner rounder did push the invitation total over what I had expected to pay but I consider these two items investments for my future crafting!**

Sunday, April 11, 2010

Flowers on a Budget

So, you probably got, from my centerpiece tutorial that real flowers will not be making an appearance at our wedding in 4 months. So I set out on yet another to Hobby Lobby to figure out how to make my own bouquets and boutonnieres. Here are the results:

A "W" charm for my future last name.
The boutonnieres:

These pictures really don't do the boutonnieres justice. They are so cute in person! The blue is for Josh (to match my bouquet), and his best man and the Dad's will wear the yellow. My Maid of Honor and our two adorable little flower girls will have yellow flowers as well.

So all of these flowers were put together with absolutely no prior experience, just some research on YouTube. Pretty good, eh? And the best part? They are done already and we still have four months to go! Just one more thing I won't have to worry about in August!

I bought all of the flowers and supplies for my bouquet for just under $40.00 and used the left overs to whip up the boutonnieres. Definitely under budget!

Tuesday, March 30, 2010

Our DIY Centerpieces - Tutorial

That's right, I'm doing our centerpieces and they are way more simple to assemble than those pesky invitations. Since we're not having a sit down dinner, we're having about 6-8 tabels inside that seat 6 people each. This way people don't have to stand and eat but they can just sit and get up as they please. No assigned seating. There are also picnic tables out on the deck so people can take a break from dancing but I'm pretty sure that there won't be any of these centerpieces on the outdoor tables. I defnitely wanted to keep them simple, classic, and close to the table. So here it goes.

I started out with a round, flat vase that I found at the Dollar Tree for (you guessed it) $1.00 each:


I went to Hobby Lobby and found bunches of tulips that were fifty percent off. I bought about six bunches (3 yellow and 3 white) for $3.50/ea. Before I started, I cut the wire stems to about 2 inches in length and removed the plastic tubing around them to make it easier to stick them in the foam.


You'll also need, a green foam block to keep them in place (I cut the one I bought in half with a knife because it was taller than the vase), double sided tape, and I used 2.25in Christmas ribbon that was the perfect width for the vase (bought after Christmas: 60 ft. for $2.50).

1. Wrap the ribbon once around the vase and secure it with the double-sided tape. Then place the green foam square inside.


2. Now begin assembling flowers.


3. Once I arranged all of the flowers, I sort of "fluffed" them up to fill all of the space. And "TADA", they are done.

Here's a picture of the yellow and white:


Total cost for all centerpiece material:
Flowers (6 bushels): $21.00
Vases (8): $8.00
Foam Blocks (4): $5.00
Ribbon (alot): $2.50
GRAND TOTAL: $36.50
(Pretty good, huh?)

Monday, December 28, 2009

Budget Finds

Hello Everyone!

I thought I'd do a post on a few of the things I've found for a really good deal.

To finish off the last of the Christmas items I got for half price, I start with these decorative branches. They are glittery and 'swirly' and I really love them. There are two in each bunch and I bought 3 bunches. Doesn't that sound like a third grade math problem?? "How many branches did she have, class??" "SIX!!!" lol


Then from the Dollar Tree, I bought a few glass vases. The first is a relatively small dish and I think they will be used for the dessert spread. Perhaps as candy holders.


I purchased three of these.

I also bought two more traditional vases. These will probably also be used on the around the desserts but most likely to house the sparkly branches.
Cost:
  • Branches, 6 ct: $6.00
  • Small dish, 3 ct: $3.00
  • Vase, 2 ct: $2.00

The Dollar Tree can be a gamble, but there have been quite a few times when I have found amazing things for super cheap! Happy Shopping!