Showing posts with label holidays. Show all posts

Monday, January 2, 2012

Christmas Storage - Easy DIY Methods

We all know how excited I was to put up our Christmas decorations. In fact, I was pretty sneaky about getting it up early. But, now I'm getting excited about organizing the way I store all of our holiday decor. What a conundrum!


Once again, it was pinterest to the rescue with some great, simple, and cheap organization ideas, the number one being storing your ornaments in plastic cups that have been glued to cardboard. This makes sense for a multitude of reasons, the best being that they won't be rolling around, hitting eachother in storage, if you keep the hooks on, they won't get tangled up, and you can remove the whole board they're attached to for easy decorating, rather than going back and forth with a few ornaments at a time. So here is a peek at my Christmas storage:


As you can see, I just hot glued the shorter plastic cups to layers of cardboard that fit the storage container. I purchased these particular containers from Wal-Mart about two years ago. They are made up of a strong fabric, so they weren't doing much to protect my ornaments from damage. And even though these ornaments or the "shatter-proof" kind, I still want to keep them in good shape. The cups provide each ornament with a cozy space that keeps them ding free. On the top layer, I also added a separate cup for ornament hooks. This way they are always by the ornaments and easy access.


Here's a peek at the layers. With three stacks, it holds 50 ornaments, which is my entire collection of these silver, gold, and glittery ball ornaments.


For my more special and breakable ornaments, I purchased a storage container with a hard, plastic shell. Each ornament still has its own space and is protected from damage.


For the rest of my Chrismas decor, like the tree skirt and topper, I used another red, fabric storage bin. To give my decorations some more protection, I fashioned a foam core insert to create a hard shell. I just cut it to size and hot-glued the frame together. Easy peasy! It zips right up and all of my other decorations are in one easy spot.


So, there you have it. A rundown of my holiday storage plus some super easy (and inexpensive) tips to retrofit your current storage for more protection.


Do you get excited about organizing holiday storage? Just me? Bueller? Do you have any other tips or tricks for easy storage?? Share below!

Sunday, November 27, 2011

Our Christmas Tree + DIY Ruffled Tree Skirt

I'll admit, I put up our Christmas decorations in a very sneaky fashion. Josh said I couldn't put up any Christmas related decor until after Thanksgiving (something like "one holiday at a time" or whatever). So, on Wednesday I started messing around with a winter mantle (nothing overtly Christmas-y), then, on Thursday, I put up our stockings. But it wasn't until I had our Christmas tree out of the box that Josh even noticed I was being so sneaky. Yes, I'm good.

I just get so excited about Christmas. Mostly because I bought the majority of our decorations on super sale after last Christmas. I've waited a whole year to put up our new stuff. So, here are some beautiful, glowy pictures of our Christmas Tree!


Another, reason I'm so excited about this year's tree is because our old tree was about 2 feet tall and it held about 5 ornaments before it started looking weird. But we're moving up... to a 4.5 foot tall pre-lit awesome tree. Love!

As far as ornaments go, I've got a pretty nice system going on. Josh and I have a small (but growing) collection of meaningful ornaments, that include an ornament from the first Christmas we were dating (2007), an ornament from our first married Christmas together (2010), and this year I added an adorable and inexpensive Texas cookie-cutter fashioned into a Christmas ornament.


All other ornaments are simple ball ornaments that were left over from our wedding. They are all silver and gold and really let our special ornaments stand out. For garland, I used some leftover fabric strips from our Christmas skirt. Simple and still inexpensive.

Our tree skirt is one of the holiday items I'm most proud of. I found this great tutorial here on Pinterest. In the past, I've always favored bright and colorful Christmas decor, but this year I really got into neutral and metallic decoration, so this tree skirt immediately drew my attention. Plus, it's a no-sew project. Basically, just strips of fabric hot glued to a tree skirt. It took me a few hours to complete and the burned fingers were totally worth it! Take a peek.


So, there you have it. There are a lot more Christmas posts to come including gift wrapping, our winter mantle, and a super easy tutorial on temporarily changing up those cone trees that are so popular now. Stay tuned!

Do you have your Christmas decorations up yet? Or are you waiting for December? Do you go with a theme or color scheme for decor? I'd love to know! And also, I'm on Pinterest!

Monday, November 14, 2011

Gift Wrapping Inspiration

I am seriously getting into Christmas decor early this year. (Sorry Thanksgiving!) And thanks to Pinterest, I've been saving lots of inspiration for pretty presents. While continuing with the never-ending mission to simplify our lives and saving money, I've decided to quit buying wrapping paper and stick with kraft paper. There are so many different ways to customize simple paper, not only for Christmas, but for all other occasions.

Here are some of my favorites below:

Silk ribbon in any color would be beautiful with this bow!


Tutorial on this gorgeous bow here.


Simple customizations for kraft paper wrapping. Use things you already have around the house! Doilies, yarn, or scraps of left over ribbon. The possibilities are endless! I especially love the little star bunting on the bottom!


Fun customizations here


Fabric scraps for wrapping and rosettes! Probably free if you have lots of leftover fabric pieces from other projects. Simple and beautiful.


Found on Babble.


Super simple newspaper and twine. And a simple gift tag solution: single initials.


Not only are these options more beautiful than traditional wrapping paper, but they are simple, and in most cases free! (What beats free around Christmas? I think nothing!) And even though it might be a little silly, I just love the look of coordinating presents! Make the tree look even more beautiful. So, while I'm not allowed to put out Christmas decorations until after Thanksgiving ("one holiday at a time" is Josh's policy) I'm fine just preparing for a great holiday season.


What is your favorite way to wrap gifts? Do you like coordinating colors, paper, and ribbon or is a mix-and-match style more your thing?

Tuesday, November 8, 2011

DIY Holiday Wreath - Inspired by Pinterest

So, I finally joined the Pinterest train, and I am in love! It is so much fun. There is so much inspiration for DIY projects, crafts, parties, and home design. Seriously, it's heaven.

But, like many bloggers, I don't want to pin stuff and never actually create anything. So I set out to create a few of my favorites and first up, I made a holiday wreath. Usually, I'm not really really a fan of traditional fall decor. My home design preferences are usually brighter and color colors like blue and greens and the warm tones of fall doesn't really fit, in my opinion. But these two wreaths below, I love!


From Here


From Here

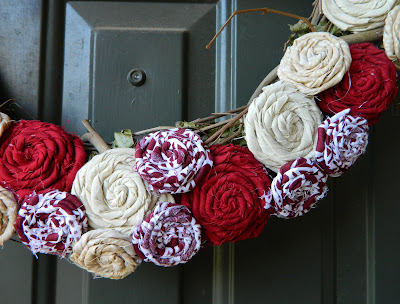
I love the berries and deep reds of the first wreath and, of course, the flower rosettes of the second. So here's my combination.


I picked up an inexpensive wreath from Wal-Mart and some clearance fabric scraps from Hobby Lobby to make fabric rosettes. A few episodes of "The Office" later, I had enough to cover about half of the wreath and start hot gluing them on. The berries were already owned from last Christmas so I threaded them in. I also used a left over shred to make a rustic bow for the top.


I used some left over cream ribbon to hang the wreath on an upside down 3M hook. Removable and I already had it in the house! (I also learned this trick on Pinterest!)


I think I've found my ideal fall decor. Deep wine reds with neutrals tied in. Gorgeous! And not only does this wreath look great for fall, but it could also easily transition into a Christmas wreath with a few tweaks like more metallic accents and a bunting message like in the second inspiration picture. I love it!


All together, I spent about $8.00 total. Yes! Tutorials for both inspriation pictures can be found in their links. Check back later this week for some more Pinterest inspired craft projects!

Sunday, February 13, 2011

Happy Valentine's Day!

Happy Valentine's Day everyone!!!

Hope you are spending it with someone you love!


Image from Simply Bloom Photography


Don't you just love this photo? Looking at it always make me smile. The couple is just so cute! Want more? Head over to my Très Sweet Designs blog here to see some fun Valentine's Day cookies!

Saturday, December 25, 2010

Monday, December 13, 2010

Update + Cool Gifts for your Man

So, I've been a little absent lately, but in my defense it is finals week. And go figure, on this Monday of finals week, I wake up at 6:30AM feeling fresh and ready to start the day. I even washed the breakfast dishes and folded clothes in the dryer! That never happens. I told Josh that I was trying to see how much housework I could do this morning before he passed out in shock.

But luckily enough, I've been compiling a little gift guide for the hard-to-buy-for guy (That's a mouth full, huh?). I'm not really into giving gift cards. Maybe I'm a little crazy strange, but I just prefer gifts wrapped in boxes and bows. Weird? So if you're looking for a cool, quirky gift, maybe this will help!


Personalized Steak Branding Iron


Eye Glasses Holder


Perpetual Calendar

Wednesday, November 17, 2010

Autumn Mantle

I can't tell you how tempting it was to skip the "Turkey Day" decorating and go straight for Christmas but Josh wouldn't let me. And I just couldn't justify leaving Halloween decor up through November. So, I set out to create a cute Thanksgiving Mantle without spending a thing and by looking around the house and the outdoors, I would say mission accomplished!

On the very left hand side, you can see a branch that I found and spray painted gold. I used these paper patterns to punch out circles and decorate the branch.

I switched out the "October" page for another magazine clipping that reflected a Fall theme and spruced it up with a vintage cookbook I received for Christmas last year.

I decided to leave the birdhouse and mini-pumpkins but added my pumpkin pie candle (yum!) and a vase filled with the cutest little acorns. And used a cursive font to print out a cute sign.

In total, I spent zero dollars! But maybe I paid for it in something else as I tried to inconspicuously tear a branch off of a tree in our complex and pick up acorns from the tree by our bus stop. Eh, it was worth it!

Monday, November 1, 2010

Halloween at Apartment 1313

Welcome to November! I hope you all had a safe and fun Halloween. I thought I would share some more pictures and details from the party Josh and I threw this past weekend. The thing that sparked our interest in have a Halloween party was the fact that our apartment number is 1313. Creepy on its own accord, right?

And of course, this whole month, I've been going on about non-traditional Halloween themes. This year, I chose black birds/bird silhouettes.

We invited people through Facebook, so I found an image of bird silhouettes and added the party information in paint with a creepy font. This one was Destroyed License Plate from dafont.com. I also made fun food cards from another "googled" image.


Dead flowers add a nice touch, eh?


I picked up some "matte-finish" ornaments from Hobby Lobby and filled them with black feathers to create a "black orb" kind of feel.


Here you can see my first attempt at decorating cookies. As I mentioned in my October Favorites, I have fallen in love (fairly quickly) with cookies. For this party, I made ghosts and black cats. They turned out rather well for a beginner (if I do say so, myself). More cookie updates to come!


And another note? I will never, ever make candied apples again. First of all, I didn't find actual sticks, so I ended up using the popsicle sticks that came in the kit, so while they looked spooky (because they were really deep red) they didn't have the same effect as actual sticks would have had. And then of course was the problem of "they were just a pain in the ass". They were so sticky, I couldn't get them off of the cookie sheet. I literally had to use scissors to cut them up. They did look creepy, but it wasn't worth the work. Now I know.

Once our friends arrived, we had an awesome time! There were so many candles lit, it looked like we were going to be sacrificing someone. Good (and interesting) conversation with good friends.

What did you do for Halloween?

Sunday, October 31, 2010

Happy Halloween!

More pictures from our Halloween Party coming soon! Have a safe and fun Halloween.

Saturday, October 23, 2010

Our House is Haunted!

By a very spooky pumpkin carved by Mr. and Mrs. AWWY.


The knife gives a subtle touch, don't you think?

Tuesday, October 12, 2010

Halloween Decorating

Finally! Fall has... well.. fallen and despite the still-warm temperatures down in Texas I have embraced the season. Halloween is around the corner and Josh and I are preparing for a fun holiday. Take a peek at our "spooked-out" mantel.

These books don't necessarily have spooky titles but they are pretty beat up, which makes them perfect for the display. My poor Harry Potter and the Goblet of Fire book has so much damage (from being read hundreds of times and being taken everywhere with "middle-school" me) that it almost looks cursed.

The center art piece is actual Josh's wedding gift to me. He commissioned his sister, Rachel, to create this rendition of us getting married. It is one of a kind and I couldn't love it more. Isn't it awesome?

The underlying theme for this Halloween is "birds". Silhouettes of crows and owls, along with vintage birdhouses provide a creepy vibe without being overly "halloweeny". The bird house, "boo" candle holder, and owl silhouette were from Hobby Lobby (50% off). The "October" picture is actually from a "Real Simple" magazine. And then of course, we have drippy candles and mini pumpkins. I think it turned out pretty darn well. Almost ready for our Halloween party!

Friday, October 1, 2010

Welcome to October.

Where did September go? I cannot believe that October is here. Upon waking up this morning, the weather is gorgeous, the morning DJ's are talking about all of the scary movies coming out this month, and I already set out our cute little ceramic pumpkin on our bar. It's officially my favorite season! And to kick it off, how about some costume contenders for this year's festivities?


Pin-Up Sailor Girl

OR


Greek Goddess

Those are the top two choices now. I already have the blue dress and I have the material to make a Greek costume. So, it's just up to which one I lean towards more. I just don't know!!!

Thoughts? What are you planning to be for Halloween??

Tuesday, September 14, 2010

Spooky Inspiration

I am so ready for October. Not only does the weather cool down (which I'm dying for) but Halloween is one of my favorite holidays. It's just another chance to get creative. Now, I'm all for the orange and black candies, spider rings, and googly eyed cupcakes for a younger crowd, but Josh and I are considering hosting a small Halloween shindig and those duds aren't going to fly.

It's time to take Halloween to the next level. Sophisticate it, if you will. Here are some inspiration pictures I am loving!


black candied apples


image


subtly bloody candles


image

I have got to make those apples! They look so creepy. And the best thing about these ideas is that most of the materials can be found in your own home already. It's an easy way to put a little spook into your home. Enjoy!