Sunday, November 27, 2011

Our Christmas Tree + DIY Ruffled Tree Skirt

I'll admit, I put up our Christmas decorations in a very sneaky fashion. Josh said I couldn't put up any Christmas related decor until after Thanksgiving (something like "one holiday at a time" or whatever). So, on Wednesday I started messing around with a winter mantle (nothing overtly Christmas-y), then, on Thursday, I put up our stockings. But it wasn't until I had our Christmas tree out of the box that Josh even noticed I was being so sneaky. Yes, I'm good.

I just get so excited about Christmas. Mostly because I bought the majority of our decorations on super sale after last Christmas. I've waited a whole year to put up our new stuff. So, here are some beautiful, glowy pictures of our Christmas Tree!


Another, reason I'm so excited about this year's tree is because our old tree was about 2 feet tall and it held about 5 ornaments before it started looking weird. But we're moving up... to a 4.5 foot tall pre-lit awesome tree. Love!

As far as ornaments go, I've got a pretty nice system going on. Josh and I have a small (but growing) collection of meaningful ornaments, that include an ornament from the first Christmas we were dating (2007), an ornament from our first married Christmas together (2010), and this year I added an adorable and inexpensive Texas cookie-cutter fashioned into a Christmas ornament.


All other ornaments are simple ball ornaments that were left over from our wedding. They are all silver and gold and really let our special ornaments stand out. For garland, I used some leftover fabric strips from our Christmas skirt. Simple and still inexpensive.

Our tree skirt is one of the holiday items I'm most proud of. I found this great tutorial here on Pinterest. In the past, I've always favored bright and colorful Christmas decor, but this year I really got into neutral and metallic decoration, so this tree skirt immediately drew my attention. Plus, it's a no-sew project. Basically, just strips of fabric hot glued to a tree skirt. It took me a few hours to complete and the burned fingers were totally worth it! Take a peek.


So, there you have it. There are a lot more Christmas posts to come including gift wrapping, our winter mantle, and a super easy tutorial on temporarily changing up those cone trees that are so popular now. Stay tuned!

Do you have your Christmas decorations up yet? Or are you waiting for December? Do you go with a theme or color scheme for decor? I'd love to know! And also, I'm on Pinterest!
Monday, November 14, 2011

Gift Wrapping Inspiration

I am seriously getting into Christmas decor early this year. (Sorry Thanksgiving!) And thanks to Pinterest, I've been saving lots of inspiration for pretty presents. While continuing with the never-ending mission to simplify our lives and saving money, I've decided to quit buying wrapping paper and stick with kraft paper. There are so many different ways to customize simple paper, not only for Christmas, but for all other occasions.

Here are some of my favorites below:

Silk ribbon in any color would be beautiful with this bow!


Tutorial on this gorgeous bow here.


Simple customizations for kraft paper wrapping. Use things you already have around the house! Doilies, yarn, or scraps of left over ribbon. The possibilities are endless! I especially love the little star bunting on the bottom!


Fun customizations here


Fabric scraps for wrapping and rosettes! Probably free if you have lots of leftover fabric pieces from other projects. Simple and beautiful.


Found on Babble.


Super simple newspaper and twine. And a simple gift tag solution: single initials.


Not only are these options more beautiful than traditional wrapping paper, but they are simple, and in most cases free! (What beats free around Christmas? I think nothing!) And even though it might be a little silly, I just love the look of coordinating presents! Make the tree look even more beautiful. So, while I'm not allowed to put out Christmas decorations until after Thanksgiving ("one holiday at a time" is Josh's policy) I'm fine just preparing for a great holiday season.


What is your favorite way to wrap gifts? Do you like coordinating colors, paper, and ribbon or is a mix-and-match style more your thing?

Wednesday, November 9, 2011

How You Know He's a Keeper

Josh and I are discussing Christmas gift ideas for eachother and this is what he said:

"Everything I want to get you is too expensive for right now... like a kitchen remodel."

I'll take that!

Tuesday, November 8, 2011

DIY Holiday Wreath - Inspired by Pinterest

So, I finally joined the Pinterest train, and I am in love! It is so much fun. There is so much inspiration for DIY projects, crafts, parties, and home design. Seriously, it's heaven.

But, like many bloggers, I don't want to pin stuff and never actually create anything. So I set out to create a few of my favorites and first up, I made a holiday wreath. Usually, I'm not really really a fan of traditional fall decor. My home design preferences are usually brighter and color colors like blue and greens and the warm tones of fall doesn't really fit, in my opinion. But these two wreaths below, I love!


From Here


From Here

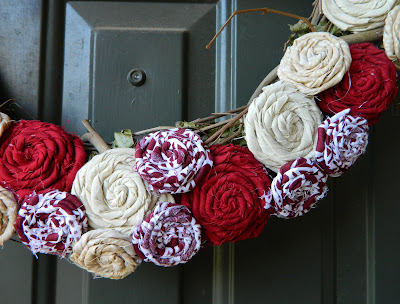
I love the berries and deep reds of the first wreath and, of course, the flower rosettes of the second. So here's my combination.


I picked up an inexpensive wreath from Wal-Mart and some clearance fabric scraps from Hobby Lobby to make fabric rosettes. A few episodes of "The Office" later, I had enough to cover about half of the wreath and start hot gluing them on. The berries were already owned from last Christmas so I threaded them in. I also used a left over shred to make a rustic bow for the top.


I used some left over cream ribbon to hang the wreath on an upside down 3M hook. Removable and I already had it in the house! (I also learned this trick on Pinterest!)


I think I've found my ideal fall decor. Deep wine reds with neutrals tied in. Gorgeous! And not only does this wreath look great for fall, but it could also easily transition into a Christmas wreath with a few tweaks like more metallic accents and a bunting message like in the second inspiration picture. I love it!


All together, I spent about $8.00 total. Yes! Tutorials for both inspriation pictures can be found in their links. Check back later this week for some more Pinterest inspired craft projects!